" Transparent Background for Blogs."
You can put a picture as a background for your blog. After doing that you can make your blog transparent so that the picture shows through it.........
The first step is to find or create the picture you wish to put up as the background. You can create a small picture in any graphics program. It should be small ( around 96x96 pixels would do) and 'tileable'. This means that it should repeat itself without any borders across your web page. To source such graphics from the Internet just do a Google search for 'graphic backgrounds'.
After finding the picture save it to your hard disk (make sure of any copyright conditions). Then upload the picture to Photobucket or Googlepages and copy down he link of the picture.
To put it as the background in your blog login at Blogger.com and click on Layout link on Dashboard. Then click on Edit Html subtab of Template tab. The picture has to cover the whole body of the blog so scroll down to this code in the CSS part of the template :
body {
background:$bgcolor;
margin:0;
color:$textcolor;
font:x-small Georgia Serif;
font-size/* */:/**/small;
font-size: /**/small;
text-align: center;
}
The CSS part of the template is the code which lies between <b:skin><![CDATA[ and ]]></b:skin> tags.
To the above code add these lines :
background-repeat: repeat;
background-image: url(LINK OF PICTURE);
background-attachment:fixed;
so it looks like this :
body {
background:$bgcolor;
background-image: url(LINK OF PICTURE);
background-attachment:fixed;
background-repeat: repeat;
margin:0;
color:$textcolor;
font:x-small Georgia Serif;
font-size/* */:/**/small;
font-size: /**/small;
text-align: center;
}
Replace 'URL OF PICTURE' with the link to your picture. The background-image line shows the location of the picture where you have uploaded it at Photobucket or Googlepages. The background-attachment line fixes the picture so that it does not scroll with the page. The background-repeat line tiles the picture vertically and horizontally if you give it a repeat parameter.
Click Preview and then Save Template. Clear cache and view Blog. Now that your background is ready it is time to make your blog transparent.
To create the transparent background I have used code from Mandarin Designs. To add this code login at Blogger.com and click on Layout link on Dashboard. Then click n Edit Html subtab of Template tab and scroll down to the part of the blog code which you wish to make transparent. To make the followng background transparent :
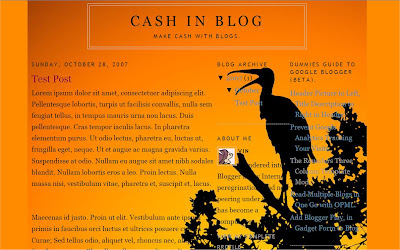
apply the code change to :
outer-wrapper
code. To apply it to the blog posts only, change the :
main-wrapper
code. This is what it looks like after applying it to posts section :
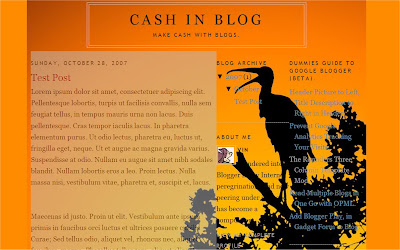
To apply it to the sidebar change the code in the :
sidebar-wrapper
section in the CSS part of the template. Similarly to apply it to the header or footer change the code in the :
header-wrapper
footer-wrapper
sections.
This is the code to apply :
background-color: silver;
opacity:.850;
filter: alpha(opacity=85);
-moz-opacity: 0.850;
After applying it to the outer-wrapper it will look like this :
#outer-wrapper {
background-color: silver;
opacity:.85;
filter: alpha(opacity=85);
-moz-opacity: 0.85;
width: 1024px;
margin:0 auto;
padding:10px;
text-align:left;
font: $bodyfont;
}
You can change 'silver' to any other colour like 'blue', 'red' to see the effect with that color. This what it looks like with a red filter applied to the outer-wrapper :
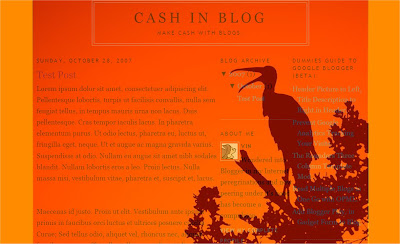
Also experiment by changing '0.85' (opacity and moz-opacity) and '85' in filter: alpha(opacity=85) to any number between 0 to 1 in the first and 1 to 100 in the second to vary the transparency or opacity.
This is what it looks like in the demo blog outer-wrapper :
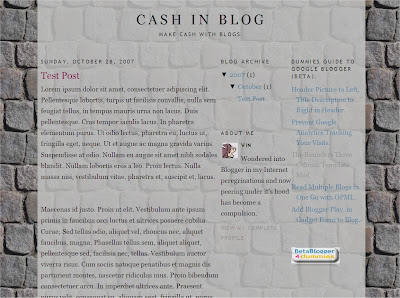
You can see the above code effect in this demo blog. I have given a white color to the various sections and the rest of the blog looks like a transparent skin sliding over a fixed wall (background).
PICTURE BACKGROUND FOR BLOGS
The first step is to find or create the picture you wish to put up as the background. You can create a small picture in any graphics program. It should be small ( around 96x96 pixels would do) and 'tileable'. This means that it should repeat itself without any borders across your web page. To source such graphics from the Internet just do a Google search for 'graphic backgrounds'.
After finding the picture save it to your hard disk (make sure of any copyright conditions). Then upload the picture to Photobucket or Googlepages and copy down he link of the picture.
To put it as the background in your blog login at Blogger.com and click on Layout link on Dashboard. Then click on Edit Html subtab of Template tab. The picture has to cover the whole body of the blog so scroll down to this code in the CSS part of the template :
body {
background:$bgcolor;
margin:0;
color:$textcolor;
font:x-small Georgia Serif;
font-size/* */:/**/small;
font-size: /**/small;
text-align: center;
}
The CSS part of the template is the code which lies between <b:skin><![CDATA[ and ]]></b:skin> tags.
To the above code add these lines :
background-repeat: repeat;
background-image: url(LINK OF PICTURE);
background-attachment:fixed;
so it looks like this :
body {
background:$bgcolor;
background-image: url(LINK OF PICTURE);
background-attachment:fixed;
background-repeat: repeat;
margin:0;
color:$textcolor;
font:x-small Georgia Serif;
font-size/* */:/**/small;
font-size: /**/small;
text-align: center;
}
Replace 'URL OF PICTURE' with the link to your picture. The background-image line shows the location of the picture where you have uploaded it at Photobucket or Googlepages. The background-attachment line fixes the picture so that it does not scroll with the page. The background-repeat line tiles the picture vertically and horizontally if you give it a repeat parameter.
Click Preview and then Save Template. Clear cache and view Blog. Now that your background is ready it is time to make your blog transparent.
TRANSPARENT BACKGROUND FOR BLOGS
To create the transparent background I have used code from Mandarin Designs. To add this code login at Blogger.com and click on Layout link on Dashboard. Then click n Edit Html subtab of Template tab and scroll down to the part of the blog code which you wish to make transparent. To make the followng background transparent :

apply the code change to :
outer-wrapper
code. To apply it to the blog posts only, change the :
main-wrapper
code. This is what it looks like after applying it to posts section :

To apply it to the sidebar change the code in the :
sidebar-wrapper
section in the CSS part of the template. Similarly to apply it to the header or footer change the code in the :
header-wrapper
footer-wrapper
sections.
NOTE : The sections in your blog may have different names depending on the template. Add the code to a section and click on Preview button to see what parts of the blog become transparent.
This is the code to apply :
background-color: silver;
opacity:.850;
filter: alpha(opacity=85);
-moz-opacity: 0.850;
After applying it to the outer-wrapper it will look like this :
#outer-wrapper {
background-color: silver;
opacity:.85;
filter: alpha(opacity=85);
-moz-opacity: 0.85;
width: 1024px;
margin:0 auto;
padding:10px;
text-align:left;
font: $bodyfont;
}
You can change 'silver' to any other colour like 'blue', 'red' to see the effect with that color. This what it looks like with a red filter applied to the outer-wrapper :

Also experiment by changing '0.85' (opacity and moz-opacity) and '85' in filter: alpha(opacity=85) to any number between 0 to 1 in the first and 1 to 100 in the second to vary the transparency or opacity.
This is what it looks like in the demo blog outer-wrapper :

You can see the above code effect in this demo blog. I have given a white color to the various sections and the rest of the blog looks like a transparent skin sliding over a fixed wall (background).
Read more: http://www.blogdoctor.me/2007/10/transparent-background-for-blogs.html#ixzz1A94FCscj
traduzido:
" Fundo transparente para Blogs."
Você pode colocar um imagem de fundo para o seu blog. Após ter feito isso você pode fazer seu blog transparente, de modo que a imagem mostra através dele .........
O primeiro passo é encontrar ou criar a imagem que deseja colocar como fundo. Você pode criar uma pequena imagem em qualquer programa gráfico. Ele deve ser pequeno (cerca de 96x96 pixels faria) e 'tileable. Isso significa que ele deve repetir-se sem fronteiras em toda a sua página web. Para fonte de tais gráficos da Internet Basta fazer uma pesquisa no Google por "pano de fundo gráfico.
Depois de encontrar a imagem salve no seu disco rígido (certifique-se de todas as condições de direitos autorais). Em seguida, fazer upload da imagem para Photobucket ou Googlepages e anote ele link da imagem.
Para colocá-lo como plano de fundo no seu blog login no Blogger.com e clique no link em Layout no painel. Em seguida, clique em Editar Html sub-seção de guia Modelo. A imagem tem que cobrir o corpo inteiro do blog, desloque-se para este código na parte CSS do modelo:
body {
background: $ bgcolor;
margin: 0;
color: $ textcolor;
font: x-small Geórgia Serif;
font-size / */:/**/ * pequeno;
font-size: / ** / pequeno;
text-align: center;
}
A parte CSS do template é o código que se situa
entre
]]></ B: skin> tags.
Para o código acima adicionar estas linhas:
background-repeat: repeat;
background-image: url (LINK DA IMAGEM);
background-attachment: fixed;
assim que olha como este:
body {
background: $ bgcolor;
background-image: url (LINK DA IMAGEM);
background-attachment: fixed;
background-repeat: repeat;
margin: 0;
color: $ textcolor;
font: x-small Geórgia Serif;
font-size / */:/**/ * pequeno;
font-size: / ** / pequeno;
text-align: center;
}
"URL DA IMAGEM" Substituir com o link para sua imagem. A linha de imagem de fundo mostra a localização da imagem, onde você carregou-o Photobucket ou GooglePages. A linha background-attachment corrige a imagem de modo que não rola com a página. Os azulejos de fundo repita-line a imagem verticalmente e horizontalmente, se você lhe dá um parâmetro de repetição.
Clique em Preview e depois em Salvar modelo. Limpe o cache Blog e ver. Agora que o fundo está pronto, é hora de fazer seu blog transparente.
Para criar o fundo transparente eu usei o código de Mandarin Designs. Para adicionar este código de login no Blogger.com e clique no link em Layout no painel. Em seguida, clique em Editar n sub-seção de HTML do guia Modelo e desça até a parte do código do blog que deseja tornar transparente. Para tornar o fundo transparente followng:
aplicar a mudança do código para:
outer-wrapper
código. Para aplicá-lo ao blog somente, a alteração:
main-wrapper
código. Isto é o que parece depois aplicá-lo na seção de postagens:
Para aplicá-lo a mudar o código de barra lateral no:
sidebar-wrapper
seção na parte CSS do template. Do mesmo modo para aplicá-lo para o cabeçalho ou rodapé alterar o código no:
header-wrapper
-footer wrapper
seções.
Este é o código para aplicar:
background-color: silver;
opacidade: 0,850;
alpha (opacity = 85);: filtro
-Moz-opacity: 0,850;
Depois de aplicá-lo à outer-wrapper será parecido com este:
# Outer-wrapper {
background-color: silver;
opacidade: 0,85;
alpha (opacity = 85);: filtro
-Moz-opacity: 0.85;
width: 1024px;
margin: 0 auto;
padding: 10px;
text-align: left;
font: $ bodyfont;
}
Você pode mudar 'prata' para qualquer outra cor, como 'azul', 'vermelho' para ver o efeito com essa cor. Isso é o que parece com um filtro vermelho aplicado ao outer-wrapper:
Também experimentar trocar 0,85 '0 '(opacidade e opacidade moz) e '85' em filter: alpha (opacity = 85) para qualquer número entre 0-1 no primeiro
e
1-100 no segundo para
variar a transparência ou opacidade .
Isto é o que parece no blog demo outer-wrapper:
Você pode ver o efeito deste código acima blog demo. Eu dei uma cor branca para as várias secções e no resto do blog se parece com uma pele transparente deslizando sobre uma parede fixa (fundo).
Imagem de fundo para BLOGS
O primeiro passo é encontrar ou criar a imagem que deseja colocar como fundo. Você pode criar uma pequena imagem em qualquer programa gráfico. Ele deve ser pequeno (cerca de 96x96 pixels faria) e 'tileable. Isso significa que ele deve repetir-se sem fronteiras em toda a sua página web. Para fonte de tais gráficos da Internet Basta fazer uma pesquisa no Google por "pano de fundo gráfico.
Depois de encontrar a imagem salve no seu disco rígido (certifique-se de todas as condições de direitos autorais). Em seguida, fazer upload da imagem para Photobucket ou Googlepages e anote ele link da imagem.
Para colocá-lo como plano de fundo no seu blog login no Blogger.com e clique no link em Layout no painel. Em seguida, clique em Editar Html sub-seção de guia Modelo. A imagem tem que cobrir o corpo inteiro do blog, desloque-se para este código na parte CSS do modelo:
body {
background: $ bgcolor;
margin: 0;
color: $ textcolor;
font: x-small Geórgia Serif;
font-size / */:/**/ * pequeno;
font-size: / ** / pequeno;
text-align: center;
}
A parte CSS do template é o código que se situa
entre
<b:skin> <! [CDATA [
e]]></ B: skin> tags.
Para o código acima adicionar estas linhas:
background-repeat: repeat;
background-image: url (LINK DA IMAGEM);
background-attachment: fixed;
assim que olha como este:
body {
background: $ bgcolor;
background-image: url (LINK DA IMAGEM);
background-attachment: fixed;
background-repeat: repeat;
margin: 0;
color: $ textcolor;
font: x-small Geórgia Serif;
font-size / */:/**/ * pequeno;
font-size: / ** / pequeno;
text-align: center;
}
"URL DA IMAGEM" Substituir com o link para sua imagem. A linha de imagem de fundo mostra a localização da imagem, onde você carregou-o Photobucket ou GooglePages. A linha background-attachment corrige a imagem de modo que não rola com a página. Os azulejos de fundo repita-line a imagem verticalmente e horizontalmente, se você lhe dá um parâmetro de repetição.
Clique em Preview e depois em Salvar modelo. Limpe o cache Blog e ver. Agora que o fundo está pronto, é hora de fazer seu blog transparente.
Fundo transparente para BLOGS
Para criar o fundo transparente eu usei o código de Mandarin Designs. Para adicionar este código de login no Blogger.com e clique no link em Layout no painel. Em seguida, clique em Editar n sub-seção de HTML do guia Modelo e desça até a parte do código do blog que deseja tornar transparente. Para tornar o fundo transparente followng:
aplicar a mudança do código para:
outer-wrapper
código. Para aplicá-lo ao blog somente, a alteração:
main-wrapper
código. Isto é o que parece depois aplicá-lo na seção de postagens:
Para aplicá-lo a mudar o código de barra lateral no:
sidebar-wrapper
seção na parte CSS do template. Do mesmo modo para aplicá-lo para o cabeçalho ou rodapé alterar o código no:
header-wrapper
-footer wrapper
seções.
NOTA: As seções em seu blog pode ter nomes diferentes dependendo do modelo. Adicione o código para uma seção e clique no botão Preview para ver quais partes do blog se tornar transparente.
Este é o código para aplicar:
background-color: silver;
opacidade: 0,850;
alpha (opacity = 85);: filtro
-Moz-opacity: 0,850;
Depois de aplicá-lo à outer-wrapper será parecido com este:
# Outer-wrapper {
background-color: silver;
opacidade: 0,85;
alpha (opacity = 85);: filtro
-Moz-opacity: 0.85;
width: 1024px;
margin: 0 auto;
padding: 10px;
text-align: left;
font: $ bodyfont;
}
Você pode mudar 'prata' para qualquer outra cor, como 'azul', 'vermelho' para ver o efeito com essa cor. Isso é o que parece com um filtro vermelho aplicado ao outer-wrapper:
Também experimentar trocar 0,85 '0 '(opacidade e opacidade moz) e '85' em filter: alpha (opacity = 85) para qualquer número entre 0-1 no primeiro
e
1-100 no segundo para
variar a transparência ou opacidade .
Isto é o que parece no blog demo outer-wrapper:
Você pode ver o efeito deste código acima blog demo. Eu dei uma cor branca para as várias secções e no resto do blog se parece com uma pele transparente deslizando sobre uma parede fixa (fundo).
Read more: http://www.blogdoctor.me/2007/10/transparent-background-for-blogs.html#ixzz1ADeFurGa


