Pesquisar
Fundo transparente para Blogs
" Transparent Background for Blogs."
You can put a picture as a background for your blog. After doing that you can make your blog transparent so that the picture shows through it.........
The first step is to find or create the picture you wish to put up as the background. You can create a small picture in any graphics program. It should be small ( around 96x96 pixels would do) and 'tileable'. This means that it should repeat itself without any borders across your web page. To source such graphics from the Internet just do a Google search for 'graphic backgrounds'.
After finding the picture save it to your hard disk (make sure of any copyright conditions). Then upload the picture to Photobucket or Googlepages and copy down he link of the picture.
To put it as the background in your blog login at Blogger.com and click on Layout link on Dashboard. Then click on Edit Html subtab of Template tab. The picture has to cover the whole body of the blog so scroll down to this code in the CSS part of the template :
body {
background:$bgcolor;
margin:0;
color:$textcolor;
font:x-small Georgia Serif;
font-size/* */:/**/small;
font-size: /**/small;
text-align: center;
}
The CSS part of the template is the code which lies between <b:skin><![CDATA[ and ]]></b:skin> tags.
To the above code add these lines :
background-repeat: repeat;
background-image: url(LINK OF PICTURE);
background-attachment:fixed;
so it looks like this :
body {
background:$bgcolor;
background-image: url(LINK OF PICTURE);
background-attachment:fixed;
background-repeat: repeat;
margin:0;
color:$textcolor;
font:x-small Georgia Serif;
font-size/* */:/**/small;
font-size: /**/small;
text-align: center;
}
Replace 'URL OF PICTURE' with the link to your picture. The background-image line shows the location of the picture where you have uploaded it at Photobucket or Googlepages. The background-attachment line fixes the picture so that it does not scroll with the page. The background-repeat line tiles the picture vertically and horizontally if you give it a repeat parameter.
Click Preview and then Save Template. Clear cache and view Blog. Now that your background is ready it is time to make your blog transparent.
To create the transparent background I have used code from Mandarin Designs. To add this code login at Blogger.com and click on Layout link on Dashboard. Then click n Edit Html subtab of Template tab and scroll down to the part of the blog code which you wish to make transparent. To make the followng background transparent :
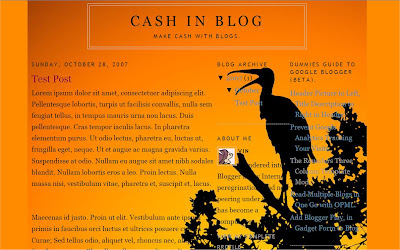
apply the code change to :
outer-wrapper
code. To apply it to the blog posts only, change the :
main-wrapper
code. This is what it looks like after applying it to posts section :
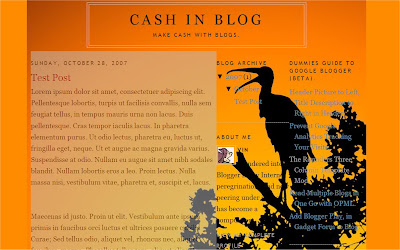
To apply it to the sidebar change the code in the :
sidebar-wrapper
section in the CSS part of the template. Similarly to apply it to the header or footer change the code in the :
header-wrapper
footer-wrapper
sections.
This is the code to apply :
background-color: silver;
opacity:.850;
filter: alpha(opacity=85);
-moz-opacity: 0.850;
After applying it to the outer-wrapper it will look like this :
#outer-wrapper {
background-color: silver;
opacity:.85;
filter: alpha(opacity=85);
-moz-opacity: 0.85;
width: 1024px;
margin:0 auto;
padding:10px;
text-align:left;
font: $bodyfont;
}
You can change 'silver' to any other colour like 'blue', 'red' to see the effect with that color. This what it looks like with a red filter applied to the outer-wrapper :

Also experiment by changing '0.85' (opacity and moz-opacity) and '85' in filter: alpha(opacity=85) to any number between 0 to 1 in the first and 1 to 100 in the second to vary the transparency or opacity.
This is what it looks like in the demo blog outer-wrapper :
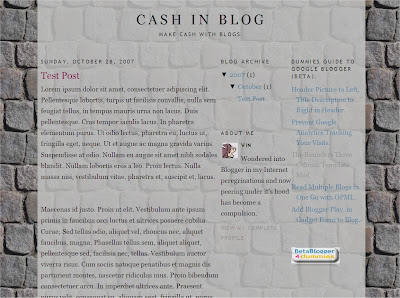
You can see the above code effect in this demo blog. I have given a white color to the various sections and the rest of the blog looks like a transparent skin sliding over a fixed wall (background).
PICTURE BACKGROUND FOR BLOGS
The first step is to find or create the picture you wish to put up as the background. You can create a small picture in any graphics program. It should be small ( around 96x96 pixels would do) and 'tileable'. This means that it should repeat itself without any borders across your web page. To source such graphics from the Internet just do a Google search for 'graphic backgrounds'.
After finding the picture save it to your hard disk (make sure of any copyright conditions). Then upload the picture to Photobucket or Googlepages and copy down he link of the picture.
To put it as the background in your blog login at Blogger.com and click on Layout link on Dashboard. Then click on Edit Html subtab of Template tab. The picture has to cover the whole body of the blog so scroll down to this code in the CSS part of the template :
body {
background:$bgcolor;
margin:0;
color:$textcolor;
font:x-small Georgia Serif;
font-size/* */:/**/small;
font-size: /**/small;
text-align: center;
}
The CSS part of the template is the code which lies between <b:skin><![CDATA[ and ]]></b:skin> tags.
To the above code add these lines :
background-repeat: repeat;
background-image: url(LINK OF PICTURE);
background-attachment:fixed;
so it looks like this :
body {
background:$bgcolor;
background-image: url(LINK OF PICTURE);
background-attachment:fixed;
background-repeat: repeat;
margin:0;
color:$textcolor;
font:x-small Georgia Serif;
font-size/* */:/**/small;
font-size: /**/small;
text-align: center;
}
Replace 'URL OF PICTURE' with the link to your picture. The background-image line shows the location of the picture where you have uploaded it at Photobucket or Googlepages. The background-attachment line fixes the picture so that it does not scroll with the page. The background-repeat line tiles the picture vertically and horizontally if you give it a repeat parameter.
Click Preview and then Save Template. Clear cache and view Blog. Now that your background is ready it is time to make your blog transparent.
TRANSPARENT BACKGROUND FOR BLOGS
To create the transparent background I have used code from Mandarin Designs. To add this code login at Blogger.com and click on Layout link on Dashboard. Then click n Edit Html subtab of Template tab and scroll down to the part of the blog code which you wish to make transparent. To make the followng background transparent :

apply the code change to :
outer-wrapper
code. To apply it to the blog posts only, change the :
main-wrapper
code. This is what it looks like after applying it to posts section :

To apply it to the sidebar change the code in the :
sidebar-wrapper
section in the CSS part of the template. Similarly to apply it to the header or footer change the code in the :
header-wrapper
footer-wrapper
sections.
NOTE : The sections in your blog may have different names depending on the template. Add the code to a section and click on Preview button to see what parts of the blog become transparent.
This is the code to apply :
background-color: silver;
opacity:.850;
filter: alpha(opacity=85);
-moz-opacity: 0.850;
After applying it to the outer-wrapper it will look like this :
#outer-wrapper {
background-color: silver;
opacity:.85;
filter: alpha(opacity=85);
-moz-opacity: 0.85;
width: 1024px;
margin:0 auto;
padding:10px;
text-align:left;
font: $bodyfont;
}
You can change 'silver' to any other colour like 'blue', 'red' to see the effect with that color. This what it looks like with a red filter applied to the outer-wrapper :

Also experiment by changing '0.85' (opacity and moz-opacity) and '85' in filter: alpha(opacity=85) to any number between 0 to 1 in the first and 1 to 100 in the second to vary the transparency or opacity.
This is what it looks like in the demo blog outer-wrapper :

You can see the above code effect in this demo blog. I have given a white color to the various sections and the rest of the blog looks like a transparent skin sliding over a fixed wall (background).
Read more: http://www.blogdoctor.me/2007/10/transparent-background-for-blogs.html#ixzz1A94FCscj
traduzido:
" Fundo transparente para Blogs."
Você pode colocar um imagem de fundo para o seu blog. Após ter feito isso você pode fazer seu blog transparente, de modo que a imagem mostra através dele .........
O primeiro passo é encontrar ou criar a imagem que deseja colocar como fundo. Você pode criar uma pequena imagem em qualquer programa gráfico. Ele deve ser pequeno (cerca de 96x96 pixels faria) e 'tileable. Isso significa que ele deve repetir-se sem fronteiras em toda a sua página web. Para fonte de tais gráficos da Internet Basta fazer uma pesquisa no Google por "pano de fundo gráfico.
Depois de encontrar a imagem salve no seu disco rígido (certifique-se de todas as condições de direitos autorais). Em seguida, fazer upload da imagem para Photobucket ou Googlepages e anote ele link da imagem.
Para colocá-lo como plano de fundo no seu blog login no Blogger.com e clique no link em Layout no painel. Em seguida, clique em Editar Html sub-seção de guia Modelo. A imagem tem que cobrir o corpo inteiro do blog, desloque-se para este código na parte CSS do modelo:
body {
background: $ bgcolor;
margin: 0;
color: $ textcolor;
font: x-small Geórgia Serif;
font-size / */:/**/ * pequeno;
font-size: / ** / pequeno;
text-align: center;
}
A parte CSS do template é o código que se situa
entre
]]></ B: skin> tags.
Para o código acima adicionar estas linhas:
background-repeat: repeat;
background-image: url (LINK DA IMAGEM);
background-attachment: fixed;
assim que olha como este:
body {
background: $ bgcolor;
background-image: url (LINK DA IMAGEM);
background-attachment: fixed;
background-repeat: repeat;
margin: 0;
color: $ textcolor;
font: x-small Geórgia Serif;
font-size / */:/**/ * pequeno;
font-size: / ** / pequeno;
text-align: center;
}
"URL DA IMAGEM" Substituir com o link para sua imagem. A linha de imagem de fundo mostra a localização da imagem, onde você carregou-o Photobucket ou GooglePages. A linha background-attachment corrige a imagem de modo que não rola com a página. Os azulejos de fundo repita-line a imagem verticalmente e horizontalmente, se você lhe dá um parâmetro de repetição.
Clique em Preview e depois em Salvar modelo. Limpe o cache Blog e ver. Agora que o fundo está pronto, é hora de fazer seu blog transparente.
Para criar o fundo transparente eu usei o código de Mandarin Designs. Para adicionar este código de login no Blogger.com e clique no link em Layout no painel. Em seguida, clique em Editar n sub-seção de HTML do guia Modelo e desça até a parte do código do blog que deseja tornar transparente. Para tornar o fundo transparente followng:

aplicar a mudança do código para:
outer-wrapper
código. Para aplicá-lo ao blog somente, a alteração:
main-wrapper
código. Isto é o que parece depois aplicá-lo na seção de postagens:

Para aplicá-lo a mudar o código de barra lateral no:
sidebar-wrapper
seção na parte CSS do template. Do mesmo modo para aplicá-lo para o cabeçalho ou rodapé alterar o código no:
header-wrapper
-footer wrapper
seções.
Este é o código para aplicar:
background-color: silver;
opacidade: 0,850;
alpha (opacity = 85);: filtro
-Moz-opacity: 0,850;
Depois de aplicá-lo à outer-wrapper será parecido com este:
# Outer-wrapper {
background-color: silver;
opacidade: 0,85;
alpha (opacity = 85);: filtro
-Moz-opacity: 0.85;
width: 1024px;
margin: 0 auto;
padding: 10px;
text-align: left;
font: $ bodyfont;
}
Você pode mudar 'prata' para qualquer outra cor, como 'azul', 'vermelho' para ver o efeito com essa cor. Isso é o que parece com um filtro vermelho aplicado ao outer-wrapper:

Também experimentar trocar 0,85 '0 '(opacidade e opacidade moz) e '85' em filter: alpha (opacity = 85) para qualquer número entre 0-1 no primeiro
e
1-100 no segundo para
variar a transparência ou opacidade .
Isto é o que parece no blog demo outer-wrapper:

Você pode ver o efeito deste código acima blog demo. Eu dei uma cor branca para as várias secções e no resto do blog se parece com uma pele transparente deslizando sobre uma parede fixa (fundo).
Imagem de fundo para BLOGS
O primeiro passo é encontrar ou criar a imagem que deseja colocar como fundo. Você pode criar uma pequena imagem em qualquer programa gráfico. Ele deve ser pequeno (cerca de 96x96 pixels faria) e 'tileable. Isso significa que ele deve repetir-se sem fronteiras em toda a sua página web. Para fonte de tais gráficos da Internet Basta fazer uma pesquisa no Google por "pano de fundo gráfico.
Depois de encontrar a imagem salve no seu disco rígido (certifique-se de todas as condições de direitos autorais). Em seguida, fazer upload da imagem para Photobucket ou Googlepages e anote ele link da imagem.
Para colocá-lo como plano de fundo no seu blog login no Blogger.com e clique no link em Layout no painel. Em seguida, clique em Editar Html sub-seção de guia Modelo. A imagem tem que cobrir o corpo inteiro do blog, desloque-se para este código na parte CSS do modelo:
body {
background: $ bgcolor;
margin: 0;
color: $ textcolor;
font: x-small Geórgia Serif;
font-size / */:/**/ * pequeno;
font-size: / ** / pequeno;
text-align: center;
}
A parte CSS do template é o código que se situa
entre
<b:skin> <! [CDATA [
e]]></ B: skin> tags.
Para o código acima adicionar estas linhas:
background-repeat: repeat;
background-image: url (LINK DA IMAGEM);
background-attachment: fixed;
assim que olha como este:
body {
background: $ bgcolor;
background-image: url (LINK DA IMAGEM);
background-attachment: fixed;
background-repeat: repeat;
margin: 0;
color: $ textcolor;
font: x-small Geórgia Serif;
font-size / */:/**/ * pequeno;
font-size: / ** / pequeno;
text-align: center;
}
"URL DA IMAGEM" Substituir com o link para sua imagem. A linha de imagem de fundo mostra a localização da imagem, onde você carregou-o Photobucket ou GooglePages. A linha background-attachment corrige a imagem de modo que não rola com a página. Os azulejos de fundo repita-line a imagem verticalmente e horizontalmente, se você lhe dá um parâmetro de repetição.
Clique em Preview e depois em Salvar modelo. Limpe o cache Blog e ver. Agora que o fundo está pronto, é hora de fazer seu blog transparente.
Fundo transparente para BLOGS
Para criar o fundo transparente eu usei o código de Mandarin Designs. Para adicionar este código de login no Blogger.com e clique no link em Layout no painel. Em seguida, clique em Editar n sub-seção de HTML do guia Modelo e desça até a parte do código do blog que deseja tornar transparente. Para tornar o fundo transparente followng:

aplicar a mudança do código para:
outer-wrapper
código. Para aplicá-lo ao blog somente, a alteração:
main-wrapper
código. Isto é o que parece depois aplicá-lo na seção de postagens:

Para aplicá-lo a mudar o código de barra lateral no:
sidebar-wrapper
seção na parte CSS do template. Do mesmo modo para aplicá-lo para o cabeçalho ou rodapé alterar o código no:
header-wrapper
-footer wrapper
seções.
NOTA: As seções em seu blog pode ter nomes diferentes dependendo do modelo. Adicione o código para uma seção e clique no botão Preview para ver quais partes do blog se tornar transparente.
Este é o código para aplicar:
background-color: silver;
opacidade: 0,850;
alpha (opacity = 85);: filtro
-Moz-opacity: 0,850;
Depois de aplicá-lo à outer-wrapper será parecido com este:
# Outer-wrapper {
background-color: silver;
opacidade: 0,85;
alpha (opacity = 85);: filtro
-Moz-opacity: 0.85;
width: 1024px;
margin: 0 auto;
padding: 10px;
text-align: left;
font: $ bodyfont;
}
Você pode mudar 'prata' para qualquer outra cor, como 'azul', 'vermelho' para ver o efeito com essa cor. Isso é o que parece com um filtro vermelho aplicado ao outer-wrapper:

Também experimentar trocar 0,85 '0 '(opacidade e opacidade moz) e '85' em filter: alpha (opacity = 85) para qualquer número entre 0-1 no primeiro
e
1-100 no segundo para
variar a transparência ou opacidade .
Isto é o que parece no blog demo outer-wrapper:

Você pode ver o efeito deste código acima blog demo. Eu dei uma cor branca para as várias secções e no resto do blog se parece com uma pele transparente deslizando sobre uma parede fixa (fundo).
Read more: http://www.blogdoctor.me/2007/10/transparent-background-for-blogs.html#ixzz1ADeFurGa
Aprenda Como:...Como adicionar a imagem de fundo.
" How To Add Picture to Background."
To add a Picture to the background of your blog...............
Step 1. FIRST create a free account at Googlepages (http://pages.google.com) to host your image/picture. In the Page Manager go to bottom frame of sidebar and click on Upload. Browse to your file on PC and click Open to upload it to your Google Page Account. At the present they offer 100 MB free disk space. Right click on the uploaded file and choose Copy Link Location. This copies the URL of the picture you have uploaded.
Step 2. Login to the Dashboard. Click on Layout under name of blog you want to add picture to. Click on Edit Html tab next to Page Elements tab. This opens the Edit Template page.
Step 3. First backup your whole template using methods described in How to Change Template.
Step 4. Then scroll down in Edit Template text box till you come to :
body {
background:$bgcolor;
margin:0;
color:$textcolor;
font:x-small Georgia Serif;
font-size/* */:/**/small;
font-size: /**/small;
text-align: center;
}
This is part of the code CSS (Cascading Style Sheet) described in Parts of the Template. This describes the whole background of your blog. To add an image here you have to add the following code before the '}' at the end :
background-image:url(WEB URL OF YOUR PICTURE );
background-repeat:no-repeat;
background-position:120% 10%;
background-attachment: scroll;
SO THAT IT LOOKS LIKE THIS :
body {
background:$bgcolor;
background-image:url(WEB URL OF YOUR PICTURE);
background-repeat:no-repeat;
background-position:120% 10%;
background-attachment: scroll;
margin:0;
color:$textcolor;
font:x-small Georgia Serif;
font-size/* */:/**/small;
font-size: /**/small;
text-align: center;
}
Instead of "WEB URL OF YOUR PICTURE" copy paste the URL of your picture at Google Pages from Step 1. The third line describes the position of the image. The first figure (120%) controls horizontal placement. The second, vertical (10%). Negative percentages will move the image up or to the left, in relation to the containing element. The repeat attribute controls tiling. If instead of 'no-repeat' you add 'repeat-x' itwill tile horizontally and 'repeat-y' will tile it vertically. The scroll attribute means your picture moves along with the textwhen you scroll up or down. If you want the picture to remain fixed while your text scrolls past it or over it when you use it as a background then change 'scroll' to 'fixed'
Save Template. Refresh Cache. View blog.
TO MAKE A CLICKABLE IMAGE BACKGROUND ON YOUR BLOG
First locate the image and upload it to a free hosting account like Google Pages. Copy the URL of your image and keep.
Then create a division to hold the image on your web page. This is done by pasting the following code in your CSS :
#imageholder {
float:right;
}
This positions the image in the upper right hand corner of your blog.
The Clickable Image is rendered by pasting the following code after the <body> tags :
<div id="imageholder">
<P><A title="TITLE OF YOUR BLOG" href="URL OF YOUR BLOG"><IMG border="0" src="GOOGLEPAGES URL OF IMAGE" alt="ALT. TITLE FOR TEXT BROWSERS AND SEARCH ENGINES" ></A></P>
</div>
In HTML the <img> tag has no end tag.
In XHTML the <img> tag must be properly closed.
Save Template
Step 1. FIRST create a free account at Googlepages (http://pages.google.com) to host your image/picture. In the Page Manager go to bottom frame of sidebar and click on Upload. Browse to your file on PC and click Open to upload it to your Google Page Account. At the present they offer 100 MB free disk space. Right click on the uploaded file and choose Copy Link Location. This copies the URL of the picture you have uploaded.
Step 2. Login to the Dashboard. Click on Layout under name of blog you want to add picture to. Click on Edit Html tab next to Page Elements tab. This opens the Edit Template page.
Step 3. First backup your whole template using methods described in How to Change Template.
FOR SAFE BLOGGING. Use Download full template link in edit Html subtab of Template tab.
Step 4. Then scroll down in Edit Template text box till you come to :
body {
background:$bgcolor;
margin:0;
color:$textcolor;
font:x-small Georgia Serif;
font-size/* */:/**/small;
font-size: /**/small;
text-align: center;
}
This is part of the code CSS (Cascading Style Sheet) described in Parts of the Template. This describes the whole background of your blog. To add an image here you have to add the following code before the '}' at the end :
background-image:url(WEB URL OF YOUR PICTURE );
background-repeat:no-repeat;
background-position:120% 10%;
background-attachment: scroll;
SO THAT IT LOOKS LIKE THIS :
body {
background:$bgcolor;
background-image:url(WEB URL OF YOUR PICTURE);
background-repeat:no-repeat;
background-position:120% 10%;
background-attachment: scroll;
margin:0;
color:$textcolor;
font:x-small Georgia Serif;
font-size/* */:/**/small;
font-size: /**/small;
text-align: center;
}
Instead of "WEB URL OF YOUR PICTURE" copy paste the URL of your picture at Google Pages from Step 1. The third line describes the position of the image. The first figure (120%) controls horizontal placement. The second, vertical (10%). Negative percentages will move the image up or to the left, in relation to the containing element. The repeat attribute controls tiling. If instead of 'no-repeat' you add 'repeat-x' itwill tile horizontally and 'repeat-y' will tile it vertically. The scroll attribute means your picture moves along with the textwhen you scroll up or down. If you want the picture to remain fixed while your text scrolls past it or over it when you use it as a background then change 'scroll' to 'fixed'
Save Template. Refresh Cache. View blog.
TO MAKE A CLICKABLE IMAGE BACKGROUND ON YOUR BLOG
First locate the image and upload it to a free hosting account like Google Pages. Copy the URL of your image and keep.
Then create a division to hold the image on your web page. This is done by pasting the following code in your CSS :
#imageholder {
float:right;
}
This positions the image in the upper right hand corner of your blog.
The Clickable Image is rendered by pasting the following code after the <body> tags :
<div id="imageholder">
<P><A title="TITLE OF YOUR BLOG" href="URL OF YOUR BLOG"><IMG border="0" src="GOOGLEPAGES URL OF IMAGE" alt="ALT. TITLE FOR TEXT BROWSERS AND SEARCH ENGINES" ></A></P>
</div>
In HTML the <img> tag has no end tag.
In XHTML the <img> tag must be properly closed.
Save Template
Read more: http://www.blogdoctor.me/2006/11/how-to-add-picture-to-background.html#ixzz1A91mcTjM
http://www.blogdoctor.me/2006/11/how-to-add-picture-to-background.html
TRADUZIDO
Como adicionar a imagem de fundo.
Para adicionar uma imagem ao fundo do seu blog ...............
Passo 1. Primeiro, crie uma conta gratuita no GooglePages (http://pages.google.com) para hospedar a sua imagem / foto. No Gerenciador de página ir para o quadro inferior da barra lateral e clique em Enviar. Navegue até o arquivo no PC e clique em Abrir para carregá-lo para o seu Google Page Conta. No momento eles oferecem 100 MB de espaço livre em disco. Botão direito do mouse sobre o arquivo carregado e escolha Copy Link Location. Isso copia o URL da imagem que você enviou.
Etapa 2. Entrar para o Dashboard. Clique em Layout em nome do blog que deseja adicionar a imagem. Clique na guia Editar HTML ao lado de guia Elementos da página. Isso abre a página Editar Modelo.
Etapa 3. primeiro backup seu modelo inteiro usando os métodos descritos no Como alterar o modelo.
Etapa 4. Em seguida, role a caixa Editar texto modelo até chegar a:
body {
background: $ bgcolor;
margin: 0;
color: $ textcolor;
font: x-small Geórgia Serif;
font-size / */:/**/ * pequeno;
font-size: / ** / pequeno;
text-align: center;
}
Esta é a parte do código CSS (Cascading Style Sheet), descritos na As peças do modelo. Este artigo descreve o contexto em seu blog. Para adicionar uma imagem aqui você tem que adicionar o seguinte código antes do "}" no final:
background-image: url (WEB URL de sua imagem);
background-repeat: no-repeat;
background-position: 120% a 10%;
background-attachment: scroll;
PARA QUE É parecido com isto:
body {
background: $ bgcolor;
background-image: url (WEB URL de sua imagem);
background-repeat: no-repeat;
background-position: 120% a 10%;
background-attachment: scroll;
margin: 0;
color: $ textcolor;
font: x-small Geórgia Serif;
font-size / */:/**/ * pequeno;
font-size: / ** / pequeno;
text-align: center;
}
Em vez de "Web URL de seu quadro" copiar e colar a URL da sua imagem no Google Pages a partir do Passo 1. A terceira linha descreve a posição da imagem. O primeiro valor (120%) controla a posição horizontal. A segunda, vertical (10%). percentagens negativas para mudarem a imagem para cima ou para a esquerda, em relação ao elemento que contém. O atributo repeat controla ladrilhos. Se em vez de "no-repeat 'você adiciona' repeat-x 'da telha itwill horizontal e' repeat-y 'se repete na vertical. O pergaminho atributo significa que sua imagem se move com o textwhen se desloca para cima ou para baixo. Se você deseja que a imagem permaneça fixa enquanto o texto rola passado, ou sobre ele quando você o usa como pano de fundo, em seguida, mudar 'scroll' para 'fixo'
Salvar modelo. Atualizar o cache. Exibir blog.
Fazer um fundo de imagem clicável NO SEU BLOG
Primeiro localize a imagem e faça o upload para uma conta de hospedagem gratuita como o Google Pages. Copie a URL da sua imagem e manter.
Em seguida, criar uma divisão para armazenar a imagem em seu web Página. Isso é feito colando o seguinte código em seu CSS:
# {AlvoFoto
float: right;
}
Isto posiciona a imagem no canto superior direito do seu blog.
A imagem clicável é processado colando o código a seguir após o <body>:
id="imageholder"> <div
<P> Title="TITLE DE SUA BLOG" href="URL DO SEU BLOG"> fronteira IMG <= "0" src = "GooglePages URL da imagem" alt = "ALT. TÍTULO DE TEXTO navegadores e PESQUISA MOTORES"> </ A> </ P
</ Div>
Em HTML o <img> tag não tem tag final.
Em XHTML o <img> marca deve ser bem fechada.
Salvar modelo
Passo 1. Primeiro, crie uma conta gratuita no GooglePages (http://pages.google.com) para hospedar a sua imagem / foto. No Gerenciador de página ir para o quadro inferior da barra lateral e clique em Enviar. Navegue até o arquivo no PC e clique em Abrir para carregá-lo para o seu Google Page Conta. No momento eles oferecem 100 MB de espaço livre em disco. Botão direito do mouse sobre o arquivo carregado e escolha Copy Link Location. Isso copia o URL da imagem que você enviou.
Etapa 2. Entrar para o Dashboard. Clique em Layout em nome do blog que deseja adicionar a imagem. Clique na guia Editar HTML ao lado de guia Elementos da página. Isso abre a página Editar Modelo.
Etapa 3. primeiro backup seu modelo inteiro usando os métodos descritos no Como alterar o modelo.
SAFE para blogs. Use Download link modelo completo em editar Html sub-seção de guia Modelo.
Etapa 4. Em seguida, role a caixa Editar texto modelo até chegar a:
body {
background: $ bgcolor;
margin: 0;
color: $ textcolor;
font: x-small Geórgia Serif;
font-size / */:/**/ * pequeno;
font-size: / ** / pequeno;
text-align: center;
}
Esta é a parte do código CSS (Cascading Style Sheet), descritos na As peças do modelo. Este artigo descreve o contexto em seu blog. Para adicionar uma imagem aqui você tem que adicionar o seguinte código antes do "}" no final:
background-image: url (WEB URL de sua imagem);
background-repeat: no-repeat;
background-position: 120% a 10%;
background-attachment: scroll;
PARA QUE É parecido com isto:
body {
background: $ bgcolor;
background-image: url (WEB URL de sua imagem);
background-repeat: no-repeat;
background-position: 120% a 10%;
background-attachment: scroll;
margin: 0;
color: $ textcolor;
font: x-small Geórgia Serif;
font-size / */:/**/ * pequeno;
font-size: / ** / pequeno;
text-align: center;
}
Em vez de "Web URL de seu quadro" copiar e colar a URL da sua imagem no Google Pages a partir do Passo 1. A terceira linha descreve a posição da imagem. O primeiro valor (120%) controla a posição horizontal. A segunda, vertical (10%). percentagens negativas para mudarem a imagem para cima ou para a esquerda, em relação ao elemento que contém. O atributo repeat controla ladrilhos. Se em vez de "no-repeat 'você adiciona' repeat-x 'da telha itwill horizontal e' repeat-y 'se repete na vertical. O pergaminho atributo significa que sua imagem se move com o textwhen se desloca para cima ou para baixo. Se você deseja que a imagem permaneça fixa enquanto o texto rola passado, ou sobre ele quando você o usa como pano de fundo, em seguida, mudar 'scroll' para 'fixo'
Salvar modelo. Atualizar o cache. Exibir blog.
Fazer um fundo de imagem clicável NO SEU BLOG
Primeiro localize a imagem e faça o upload para uma conta de hospedagem gratuita como o Google Pages. Copie a URL da sua imagem e manter.
Em seguida, criar uma divisão para armazenar a imagem em seu web Página. Isso é feito colando o seguinte código em seu CSS:
# {AlvoFoto
float: right;
}
Isto posiciona a imagem no canto superior direito do seu blog.
A imagem clicável é processado colando o código a seguir após o <body>:
id="imageholder"> <div
<P> Title="TITLE DE SUA BLOG" href="URL DO SEU BLOG"> fronteira IMG <= "0" src = "GooglePages URL da imagem" alt = "ALT. TÍTULO DE TEXTO navegadores e PESQUISA MOTORES"> </ A> </ P
</ Div>
Em HTML o <img> tag não tem tag final.
Em XHTML o <img> marca deve ser bem fechada.
Salvar modelo
Read more: http://www.blogdoctor.me/2006/11/how-to-add-picture-to-background.html#ixzz1A90sFvs0
Aprendendo:.."Criando um Background para o Blog"
Pesquisando encontrei este tutorial em
http://backgroundsblogs.blogspot.com/
2009/03/criando-um-background-para-o-blog.html
e meus devidos créditos para a fonte acima, merecidamente !
..." primeiro lugar, separamos as figuras de acordo com um tema escolhindo. É muito comum o emprego de kits gratuitos para a composição de scrapbookings digitais, desde que apenas para uso pessoal e citada a fonte. Com certeza a melhor maneira de fazer um trabalho super especial é criar suas próprias figuras." No caso deste background eu usei um kit muito fofo, My Garden, do site de Yvette and Missy:
http://misfitsscrapz.blogspot.com/"
Os passos dados:
1 - Abrir uma imagem de fundo transparente com
1450 pixels de largura
por
1100 pixels de altura.
2 - Cobrir essa imagem com o fundo desejado."
" Observem que neste trabalho usei um dos papéis floridos do kit My Garden da Yvette."
3 - Abrir outra imagem com fundo transparente
nas dimensões de
750 pixels de largura
por
" Cobri-la com figura ou a cor desejada,
não se esquecendo que esta é a área onde serão escritos os textos" (postagens).
" Logo, o ideal é não carregar com imagens fortes.
4 - Colar essa imagem
de
750 pixels de largura
1450 pixels.
" Poderá nesses passos, acrescentar alguma borda na imagem menor e , sobrepô-la à maior com o uso de Drop Shadow para um efeito mais bonito. Como disse, a criação é por sua conta"
5 - " Depois de acrescentados os elementos e os adornos pretendidos, salvar a imagem em JPG no seu computador e carregá-la para um site de hospedagens de imagens. "
..." uso o http://www.photobucket.com/
mas em contas gratuitas é sempre bom lembrar que o tamanho máximo de armazenamento permitido é de imagens com
1024 de largura "
..." o que também vai funcionar para quem está aprendendo e deseja, por enquanto, saber como funciona a coisa.
" Nos screenshots abaixo...
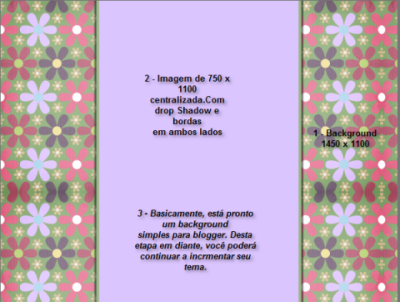 Este é o background básico que pode ser instalado no Blog
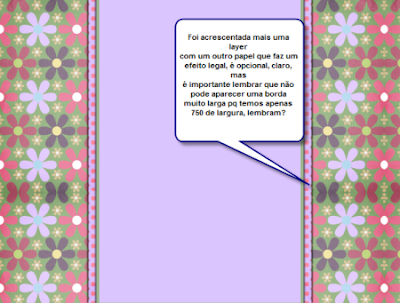
" Nesse screen, observo que coloquei mais uma layer intermediária sobre a qual usei um fundo de bolinhas, mas sem criar uma borda muito larga, pois temos um template básico instalado, o Mínima, e as medidas do background que criamos devem ajustar-se ao que foi instalado para que a visualização corra bem para todos os tipos de configuração de monitor."
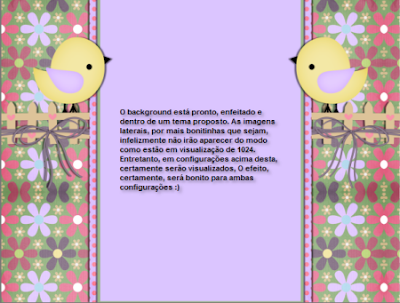 " Este é o trabalho final, em tamanho pequeno, claro, mas com uma observação a ser feita: as imagens laterais, do pintinho, da cerca e do lacinho, devem ser posicionadas um pouquinho mais para baixo do que vocês enxergam no screenshot acima. "
" Ou seja, precisei mover as figuras mais para baixo e olhando na régua lateral, foram posicionadas a partir da marca de
600 pixels de cima para baixo, quase mesmo no meio, já que a altura do trabalho final é de 1100 pixels."
" De todo modo, é importante posicionar as figuras e testar no blog para visualizar e ver se ficou legal."
" Criem vários, pesquisem os temas que podem explorar"
Leia Mais ►
http://backgroundsblogs.blogspot.com/
2009/03/criando-um-background-para-o-blog.html
e meus devidos créditos para a fonte acima, merecidamente !
Criando um Background para o Blog
..." primeiro lugar, separamos as figuras de acordo com um tema escolhindo. É muito comum o emprego de kits gratuitos para a composição de scrapbookings digitais, desde que apenas para uso pessoal e citada a fonte. Com certeza a melhor maneira de fazer um trabalho super especial é criar suas próprias figuras." No caso deste background eu usei um kit muito fofo, My Garden, do site de Yvette and Missy:
http://misfitsscrapz.blogspot.com/"
" O programa utilizado,
como sempre,
Paint Shop Pro X"
Os passos dados:
1 - Abrir uma imagem de fundo transparente com
1450 pixels de largura
por
1100 pixels de altura.
2 - Cobrir essa imagem com o fundo desejado."
" Observem que neste trabalho usei um dos papéis floridos do kit My Garden da Yvette."
3 - Abrir outra imagem com fundo transparente
nas dimensões de
750 pixels de largura
por
1100 pixels de altura.
" Cobri-la com figura ou a cor desejada,
não se esquecendo que esta é a área onde serão escritos os textos" (postagens).
" Logo, o ideal é não carregar com imagens fortes.
4 - Colar essa imagem
de
750 pixels de largura
sobre a de
1450 pixels.
" Até então você tem a imagem básica
que servirá de background."
" Poderá nesses passos, acrescentar alguma borda na imagem menor e , sobrepô-la à maior com o uso de Drop Shadow para um efeito mais bonito. Como disse, a criação é por sua conta"
5 - " Depois de acrescentados os elementos e os adornos pretendidos, salvar a imagem em JPG no seu computador e carregá-la para um site de hospedagens de imagens. "
..." uso o http://www.photobucket.com/
mas em contas gratuitas é sempre bom lembrar que o tamanho máximo de armazenamento permitido é de imagens com
1024 de largura "
..." o que também vai funcionar para quem está aprendendo e deseja, por enquanto, saber como funciona a coisa.
" Nos screenshots abaixo...
 Este é o background básico que pode ser instalado no Blog
" Nesse screen, observo que coloquei mais uma layer intermediária sobre a qual usei um fundo de bolinhas, mas sem criar uma borda muito larga, pois temos um template básico instalado, o Mínima, e as medidas do background que criamos devem ajustar-se ao que foi instalado para que a visualização corra bem para todos os tipos de configuração de monitor."
 " Este é o trabalho final, em tamanho pequeno, claro, mas com uma observação a ser feita: as imagens laterais, do pintinho, da cerca e do lacinho, devem ser posicionadas um pouquinho mais para baixo do que vocês enxergam no screenshot acima. "
" Ou seja, precisei mover as figuras mais para baixo e olhando na régua lateral, foram posicionadas a partir da marca de
600 pixels de cima para baixo, quase mesmo no meio, já que a altura do trabalho final é de 1100 pixels."
" De todo modo, é importante posicionar as figuras e testar no blog para visualizar e ver se ficou legal."
" Criem vários, pesquisem os temas que podem explorar"
Assinar:
Comentários (Atom)


